This quick reference guide aims to provide guidance on POS key functions.
Contents
Reprinting a Production Docket
Integrated EFTPOS Refund (full or partial)
Resetting Sales

- Use the No Sale button to open the cash drawer.
- Choose the Admin button on the toolbar.
- Enter your password.
- Choose End of Day, then the POS Area Reset button
- Select Media Type – Cash.
- Select the Edit Amount button.
- Enter the cash on hand by a) using the individual denominations, b) using the keyboard icon and entering the total amount, or c) use the No Variance button
- Choose OK to save.
- Repeat the process for any non-integrated EFTPOS media.
- When all required media types have been actioned, choose the Reset & Upload Sales button.
- Follow the prompts to finalise the reset.
- A POS Area Reset Report will be printed.
- Close the Admin window
Logging on EFTPOS
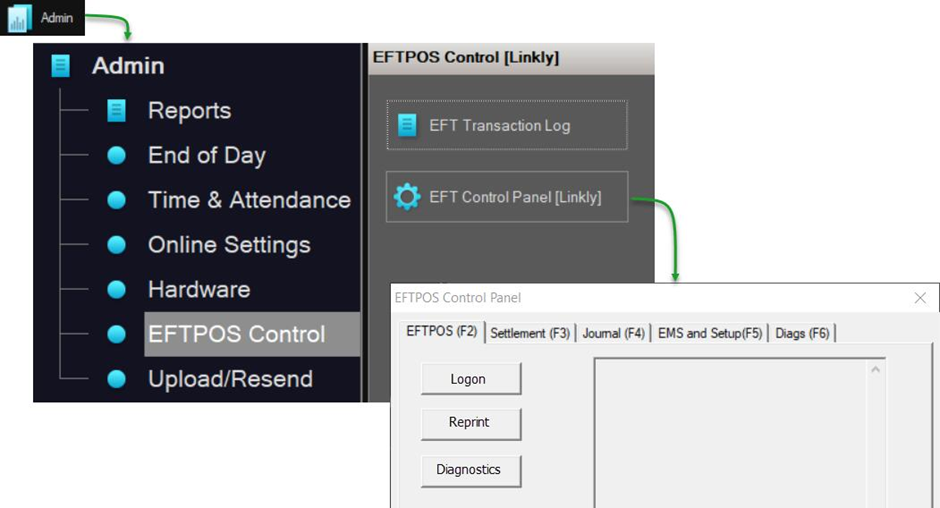
- Choose the Admin button on the toolbar.
- Enter your password.
- Choose EFTPOS Control, EFTPOS Control Panel option.
- Use the Logon button (PC-EFTPOS, Linkly).
- When Log On approved, press OK.
- Close Control Panel and Admin window.
- Repeat process on all terminals with an EFT pinpad attached.
Reprinting a Receipt
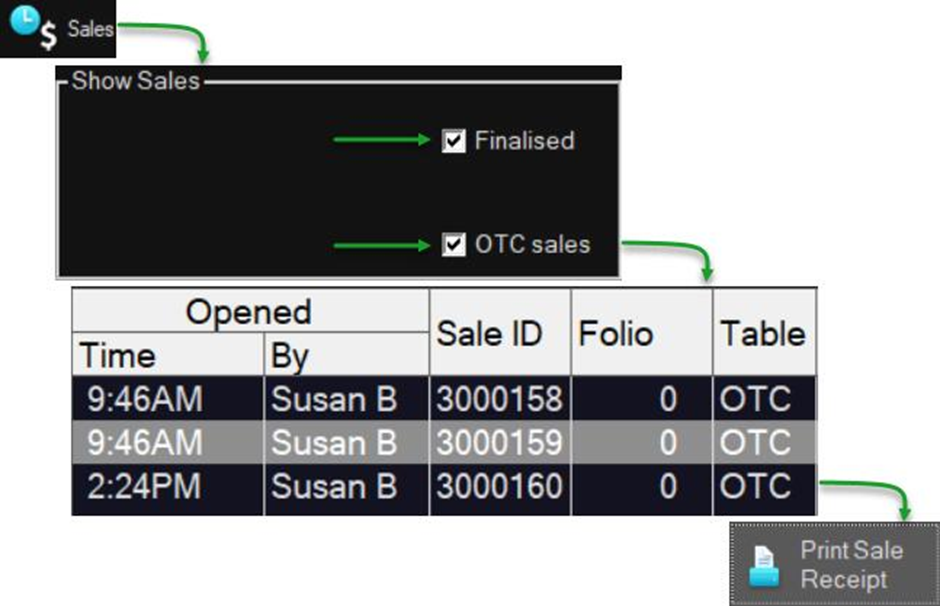
- Choose the Sales button from the toolbar.
- Ensure the Show Sales - Finalised filter is on.
- Ensure the Show Sales - OTC filter is on (if required).
- Select the required sale.
- Press the Print Sale Receipt button.
- Close the Sales File.
Reprinting a Production Docket

- Choose the Sales button from the toolbar.
- Ensure the Show Sales - Finalised filter is on
- Ensure the Show Sales - OTC filter is on (if required).
- Select the required sale and use the Edit Sale button to open.
Note: The Recall Last Sale (keypad button) can be used to retrieve the sale if the sale in question has just occurred. - Choose the Zoom Sale button from the toolbar.
- Use the Reprint Production button.
- Confirm that you want to issue the reprint.
- Close the Zoom Sale window.
- Use the Save button to close the sale.
Clearing (Voiding) a Sale
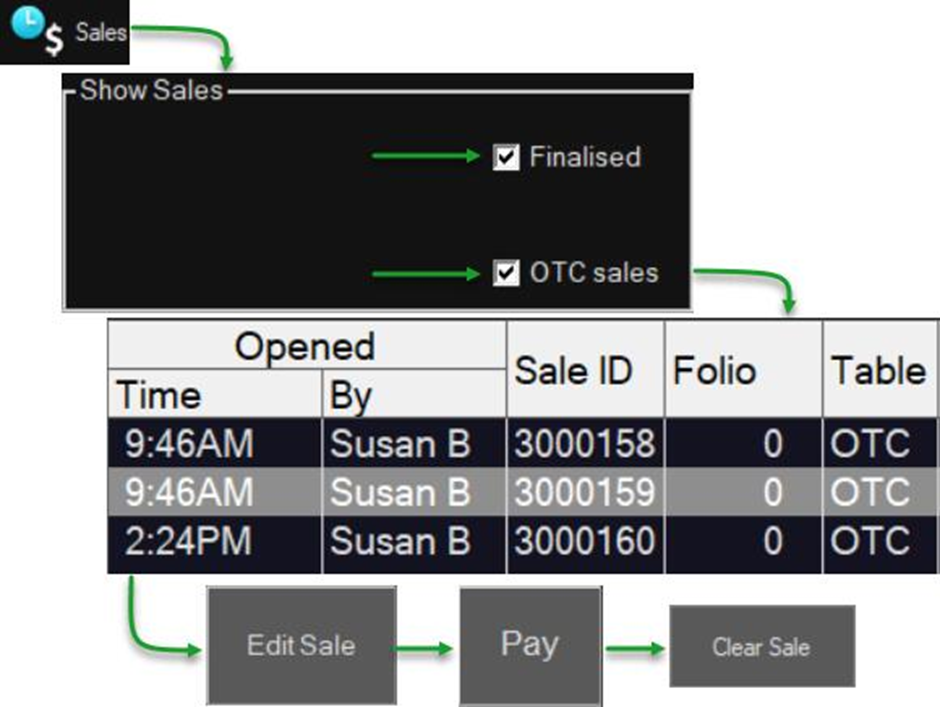
- Choose the Sales button from the toolbar.
- Ensure the Show Sales - Finalised filter is on
- Ensure the Show Sales - OTC filter is on (if required).
- Select the required sale and use the Edit Sale button to open.
Note: The Recall Last Sale (keypad button) can be used to retrieve the sale if the sale in question has just occurred. - Press the Pay button.
- Use the Clear Sale button to void the sale.
- Confirm your action, and enter your password if prompted.
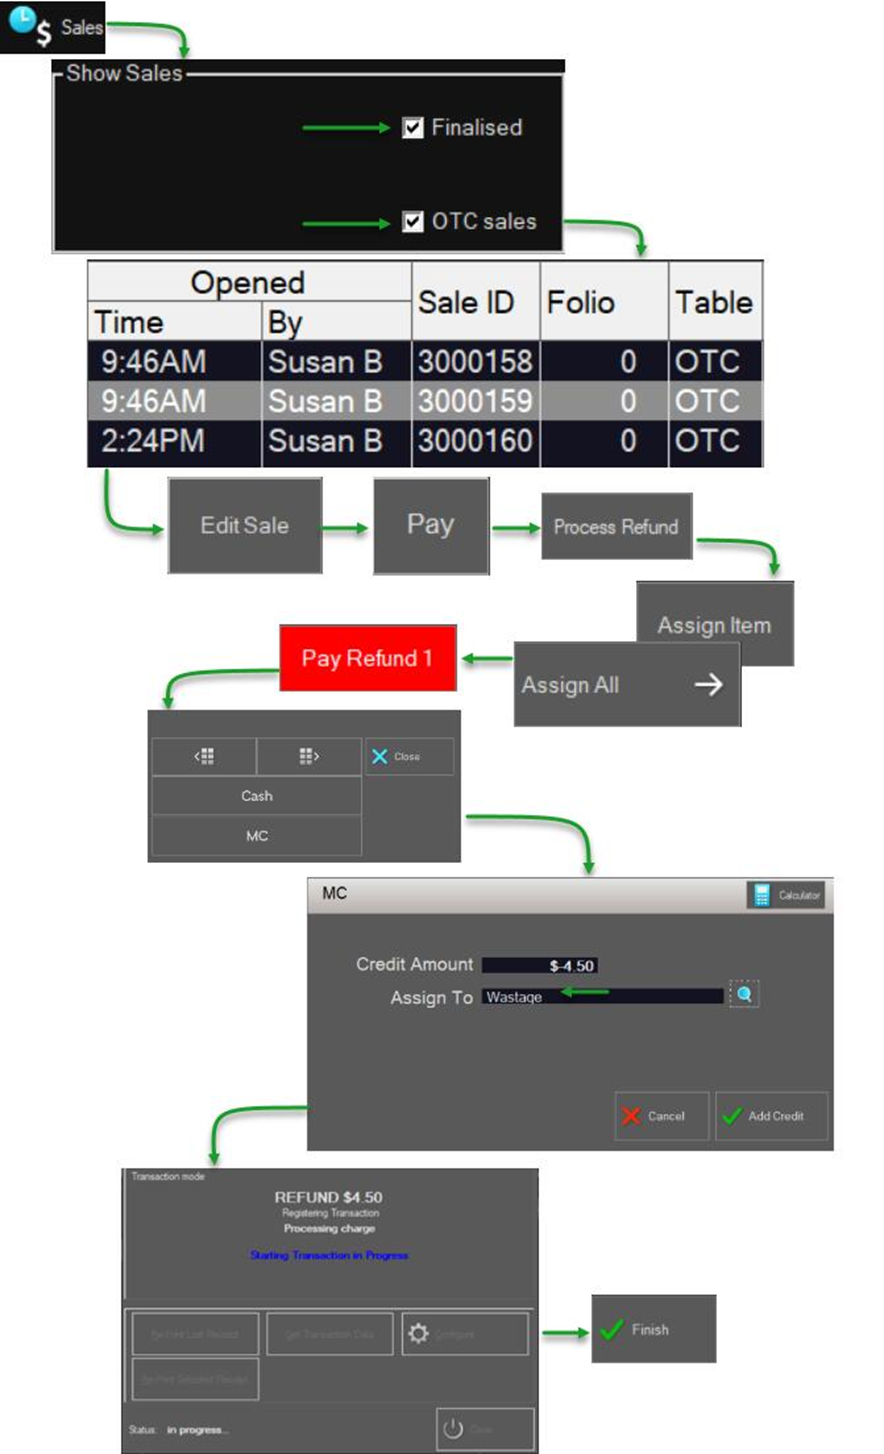
Cash Refund (full or partial)
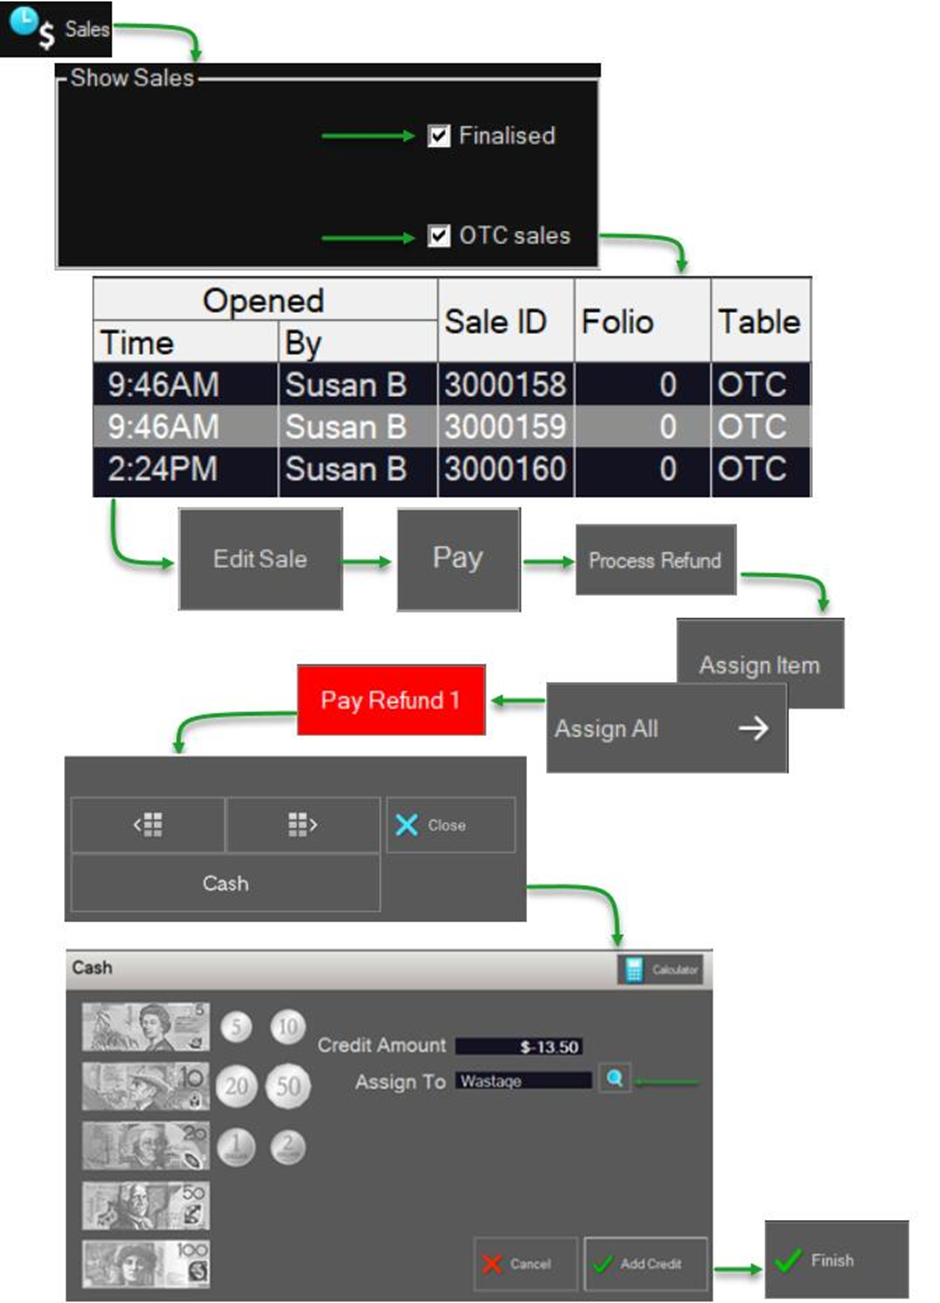
- Choose the Sales button from the toolbar.
- Ensure the Show Sales - Finalised filter is on
- Ensure the Show Sales - OTC filter is on (if required).
- Select the required sale and use the Edit Sale button to open.
Note: The Recall Last Sale (keypad button) can be used to retrieve the sale if the sale in question has just occurred. - Press the Pay button.
- Press the Process Refund button.
- Enter your password.
- Select the item(s) to be refunded and assign them to the refund list using the Assign Item, or Assign All buttons.
- Press the Pay Refund 1 button.
- Choose the Cash media to issue the refund against.
- Use the magnifier icon to display a list of the available management accounts, then select the account that the refunded items will be posted to.
- Press the Add Credit button.
- Now choose Finish to complete the refund.
Integrated EFTPOS Refund (full or partial)
- Choose the Sales button from the toolbar.
- Ensure the Show Sales - Finalised filter is on
- Ensure the Show Sales - OTC filter is on (if required).
- Select the required sale and use the Edit Sale button to open.
Note: The Recall Last Sale (keypad button) can be used to retrieve the sale if the sale in question has just occurred. - Press the Pay button.
- Press the Process Refund button.
- Enter your password.
- Select the item(s) to be refunded and assign them to the refund list using the Assign Item, or Assign All buttons.
- Press the Pay Refund 1 button.
- Choose the eftpos media to issue the refund against. (You will be offered the original eftpos media or cash).
- Use the magnifier icon to display a list of the available management accounts, then select the account that the refunded items will be posted to.
- Press the Add Credit button.
- Follow the prompts to process the refund on your eftpos pinpad.
- Now choose Finish to complete the refund.
Note: Partial refunds are not available with Adyen pinpads. You will need to refund the entire payment and reprocess it.
Downloading an Update
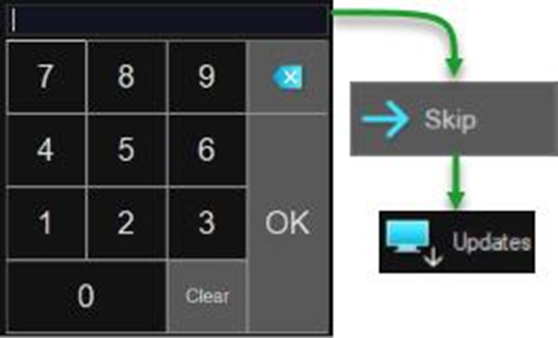
- Logon to POS.
- Use the Skip button to move past the table map (if enabled).
- Choose the Updates button from the toolbar to download any pending updates.
- The POS will automatically restart and apply updates once downloaded.
Exiting the POS

- Logon to POS.
- Use the Skip button to move past the table map (if enabled).
- Choose the Power button from the toolbar to exit the POS.
- Enter your password to authorise, and close the application.
Recording a Tip
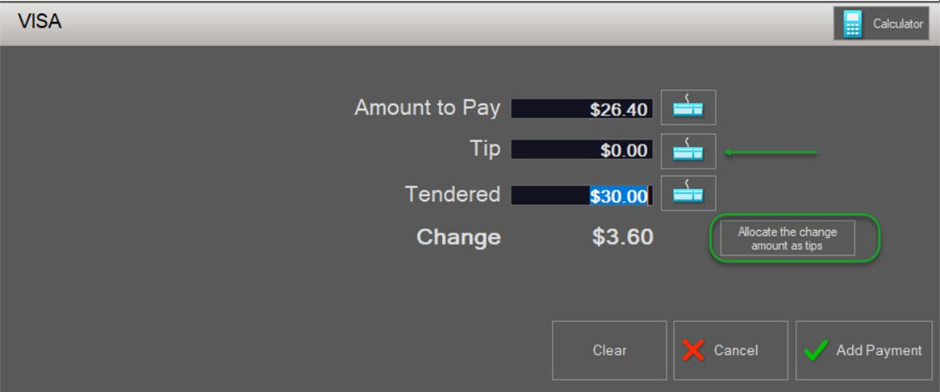
- Use the Pay button to access the sale settlement screen.
- Choose the relevant Media type.
- Enter the Tip amount, or
- Enter the Tendered amount and use the Allocate the change amount as tips button.
Note: tips for integrated EFTPOS should be applied by the customer using the EFTPOS pinpad.
Setting the Home Keypad
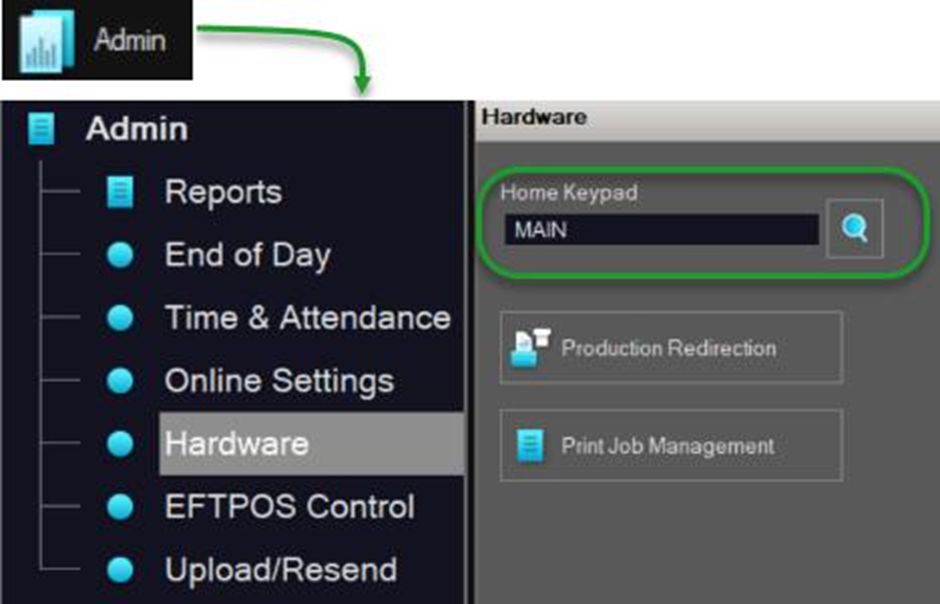
- Choose the Admin button on the toolbar.
- Enter your password.
- Select Hardware
- Choose the Home Keypad from the list of available keypads.
This is the keypad that the POS will automatically display each time the software is opened.
Resending Sales

- Choose the Admin button on the toolbar.
- Enter your password.
- Choose Upload/Resend, then the Resend Sales button
- Highlight the sales file(s) that need to be sent. You can select multiple files if you enable the Enable multiple file selection option.
- Use the Upload Selected button.
- Confirm that you want to resend the files by choosing the Send button on the confirmation message.
- Once the files are uploaded, choose OK on the confirmation message.
- Use the Close button to exit the Admin section.
Accessing POS Reports
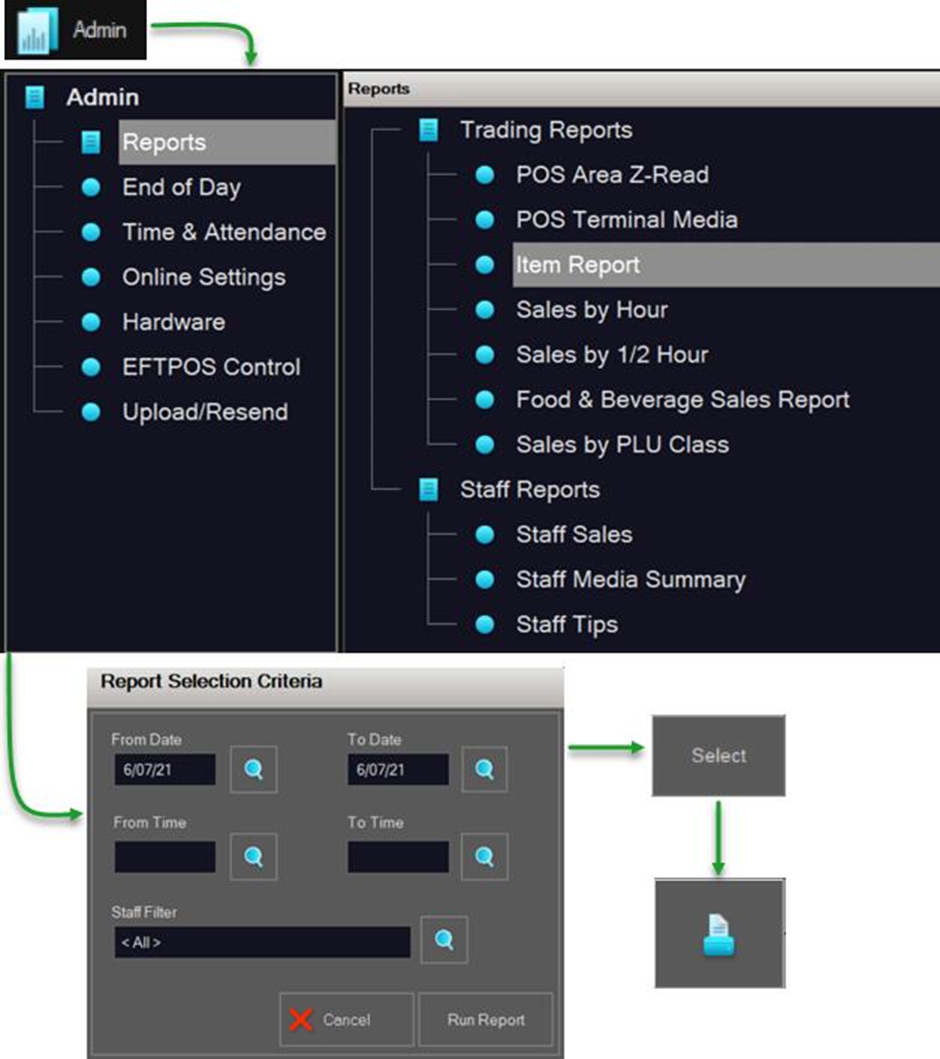
- Choose the Admin button on the toolbar.
- Enter your password.
- Choose Reports
- The list of available reports are divided into Trading Reports and Staff Reports.
- Select the relevant report and use the Select button to run.
- Enter the relevant details on the Report Selection Criteria if needed and use the Run Report button.
- Use the Printer icon to print the report.