
Summary
Redcat integrates with Xero so your trading data reaches your accounting file without manual entry. Sales are posted as draft manual journals when a reset is processed, mapped to your chart of accounts and tax codes. If you use Redcat Pay, your payouts and their processing fees are recorded as well, so the Xero bank balance matches the money that actually arrived. This article covers how both work, what's set up during implementation, and how to handle corrections.
Contents
Considerations for Redcat General Ledger Account Structure
Revenue Assignment for Instruction PLUs with Dynamic Tax Type
Redcat Pay Payout Reconciliation
The Xero File
Redcat Polygon can integrate with an online Xero accounting database.
How it works
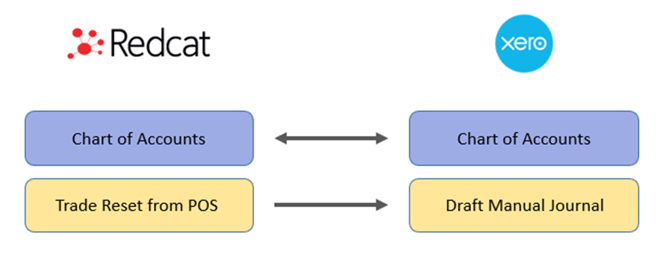
The integration between Redcat Polygon and Sage creates a mapping between the Chart of Accounts in each program, including instructions on which Tax (GST, VAT) types are relevant to each account.
Information contained within the sales reset from the POS is posted to Xero when the reset is processed in Polygon POS Management in the form of a Draft Manual Journal – for users running perpetual stock this will include the Asset | Cost journal relevant to stock decrementation.
If you use Redcat Pay, there's a second half to the integration. As well as the sales journals described above, Redcat can post your Redcat Pay payouts to Xero, so the money actually arriving in your bank account is recorded without anyone keying it in. See Redcat Pay Payout Reconciliation below.
Considerations for Redcat General Ledger Account Structure
The 'split revenue methodology' of the financial integration means that clients are not required to have a Tax inclusive and Tax free version of general ledger accounts.
However, some clients may want this for reporting purposes. For example:
4-1103 Sales
4-1104 Sales - Tax Free
If you create general ledger accounts in this way and assign the PLUs to the relevant ledger account, please be aware that programming mistakes (for example, a tax inclusive PLU assigned to the tax free ledger account) will not cause the integration to fail when processing the reset.
The programming can be corrected, and any back adjustment required should be made in the Xero database.
Paid Out Expenses
The same methodology applies to Paid Out transactions entered at the POS.
This means you may have a mix of tax inclusive and tax free Paid Out buttons programmed to the same ledger account (perhaps to the Expense account 5-2001 Miscellaneous Expenses).
Revenue Assignment for Instruction PLUs with Dynamic Tax Type
The PLU Category setting Inherit the [Tax] Type from parent item for instructional PLUs allows clients to utilise one set of Instruction PLUs to apply to different menu items (eg. Add Extras, etc). If the parent item does not attract tax, the instruction will also be recorded without tax regardless of the tax type programmed for the instruction PLU.

With the Xero Financial Integration, Instruction PLUs that Inherit the [Tax] Type from parent item will also inherit the revenue account of the parent item.
This will only occur when:
- The instructional PLU is assigned to a category where the Inherit the [Tax] type from parent item is enabled.
- The instructional PLU is sold with a parent item.
- The instructional PLU has a $ value.
- The Polygon POS Management database has a financial integration enabled.
If an instructional PLU assigned to a category where the Inherit the [tax] type from parent item is enabled is sold with a parent PLU with a split revenue assignment, the revenue account inherited will be the default revenue account assigned to the parent.
If a PLU in the category is sold without a parent item, the tax type and revenue account programmed for that PLU will apply.
Software Module Setup
Redcat Implementations or Support staff will facilitate the setup of the correct modules and walk you through the process to authorise the authentication between Redcat Polygon and Xero.
As part of the installation process, they will also facilitate the following settings and programming. We have included them here for your information and future reference.
Polygon POS Management Setup
Under File | Application Settings | External System Interfaces
- Choose Xero Interface | General
- Ensure Enable the Xero interface module is on
- In the Xero tax codes field, enter the account tax codes required for mapping, followed by pipe separators (with no extra spaces). These will become available in the External Tax Code pick list.
You can copy the Xero tax codes applicable to the UK below.
20% (VAT on Income)|Zero Rated Income|No VAT|20% (VAT on Expenses)|Zero Rated Expenses
You can copy the Xero tax codes applicable to Australia below.
BAS Excluded|GST Free Expenses|GST Free Income|GST on Expenses|GST on Income
- Interface API root URL:
/api/v1/interfaces/xero - GL posting URL:
/api/v1/interfaces/xero/sync -
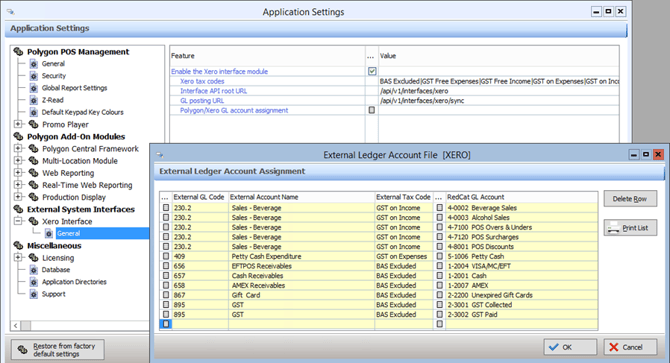
Use the select icon next to Polygon/Xero GL account assignment.
- Press the select icon in the left column, this will display a list of Xero accounts for this client, which are retrieved via API.
-
- Select the relevant Xero GL account, set the most relevant tax code for this account (the split methodology will send a mix of tax inclusive and tax free if required), then select from the right-side list to apply the corresponding Redcat GL account.
- Continue until all relevant accounts are mapped and use the OK button to save.
- In the Interface Timeout field, enter the amount of time (in seconds) that the system will wait for a response before deeming the posting to have timed out.
Processing Resets
With the module correctly enabled, posting from Redcat to Xero will occur automatically when sales resets are processed in the Revenue Download screen or via the auto-download and processing service.
If a Redcat account is detected in the GL Reference of a sales reset, which has not been mapped to an external Xero account as per the section above, the following errors will be displayed specifying the offending account(s):
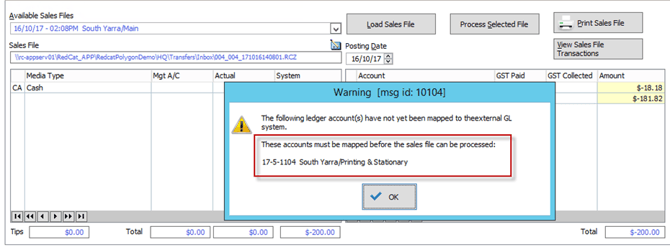
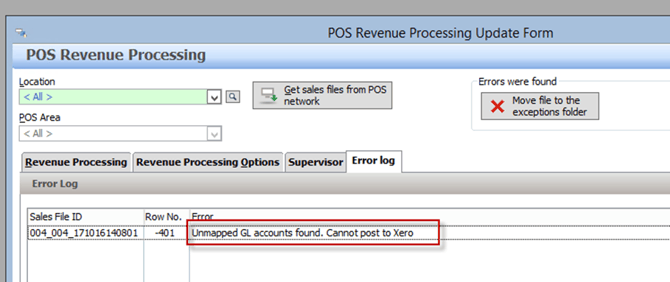
The reset will not be processed in Polygon POS Management until this is rectified. Follow the steps above to map the account correctly then return to Revenue Download to attempt the process again.
Reset Corrections
If a client requests the Support team to change a reset and reprocess it, the recommended process is as follows:
- The client identifies and deletes the relevant journals created by this sales reset in Xero.
- Redcat Support performs reset correction as per the standard process in Polygon POS Management.
- Either the client or Redcat Support re-processes the corrected reset.
- The client verifies the correct result in Xero.
Redcat Pay Payout Reconciliation
The sales journals covered above tell Xero what you sold. This part tells Xero what you were paid.
What it does
When Redcat Pay deposits a day's takings into your bank account, that deposit is called a payout. If you've connected Xero, each payout is recorded for you: the gross amount you earned, and the processing fee the payment provider deducted. The two entries net out to the exact figure that lands in the bank, so your Xero bank balance matches your bank statement without anyone having to reconcile the difference by hand.
For example, you take $1,000 in sales. The provider keeps $20 in fees and deposits $980. Xero records $1,000 received and $20 paid in fees, leaving $980. If a payout has no fee attached, only the revenue entry is created.
Each payout is posted once.
Before you choose your accounts: the sales reset journals and the payout entries are two different views of your trading. Have a quick conversation with your bookkeeper or accountant about which Xero accounts to point each one at, so revenue isn't recorded twice.
What you need first
-
Redcat Pay live in your venue
-
A Xero organisation you can authorise
-
Permission to manage Redcat Pay payouts
Setting it up
1. Connect Xero. Authorise access when prompted. This is the same Xero connection used elsewhere on the platform, so if you've already connected, you can skip ahead.
2. Open the Xero settings. In the configuration screens, open Xero. The dropdowns here are pulled live from your connected Xero organisation, so you'll only ever see accounts that actually exist.
3. Fill in the settings.
| Setting | What to choose |
|---|---|
| Enabled | Turns automatic export on and off. |
| Bank account | The Xero bank account your Redcat Pay deposits arrive in. |
| Contact | The Xero contact to attach to the transactions. |
| Receive account | The account where the gross amount is recorded. |
| Spend account | The expense account where processing fees are recorded. |
4. Save. Your settings are checked against Xero the moment you save them. If something won't work, say you've picked an account that's been made inactive, or one that isn't a valid revenue or expense account, you'll be told immediately rather than finding out days later when a payout fails to export.
With Enabled switched on and the settings saved, that's it. Payouts export on their own from here.
When payouts export
There's also a manual export on the Payouts screen, which is useful in three situations: pushing a specific payout through, retrying one that failed, and back-posting payouts from before you set the integration up.
Checking on a payout
The Payouts table shows you where each payout got to:
- Last Export shows an icon for exported, failed, or not yet exported. Hover over it for the label.
- Provider Export shows an Export button for payouts that are ready to send, meaning they're reconciled, settled, and covered by an active Xero integration. If a payout isn't ready, you'll see "Unable to export" with a tooltip explaining what's holding it up, such as a payout that hasn't been reconciled yet.
Click Export and the status icon updates straight away with the result.
Frequently asked questions
Do I need to export payouts manually?
No. Once the integration is enabled, payouts go across on their own after they're reconciled. Manual export is there for one-offs, retries, and back-posting older payouts.
What happens if an export fails?
The failure is recorded and the status icon shows as failed. You can retry it yourself from the Payouts screen. A failed export never leaves half-finished entries behind in Xero.
Can I turn it off for a while?
Yes. Switch Enabled off in the Xero settings and payouts stop exporting until you turn it back on.
Could I end up with duplicate entries in Xero?
Repeat posts of the same payout within six minutes are ignored, which covers accidental double-clicks and automatic retries. Outside that window, manually exporting a payout that already posted successfully will create a second set of entries in Xero. Check the Last Export icon before you press Export, and if it already shows as successful, leave it alone or contact Support.
What happens if I disconnect Xero?
Disconnecting removes your Xero connection and this configuration together, so you're never left half set up.
Article Change Log
| Date | Record of Changes | Author |
|
September 2026 |
|
A Crosland |
|
May 2025 |
Migration of the original article to the knowledge base. |
S Black |