There are multiple options for printing from KMS.
Only users who have Polygon Paperless Kitchen - Application Wide Permissions | System Settings enabled in their POS Staff security role will be able to access these settings. You can learn more about settings these permissions here
- Push to Print
- Print Upon Item Strike
- Print on Demand
- Auto-Print
To establish the print options:
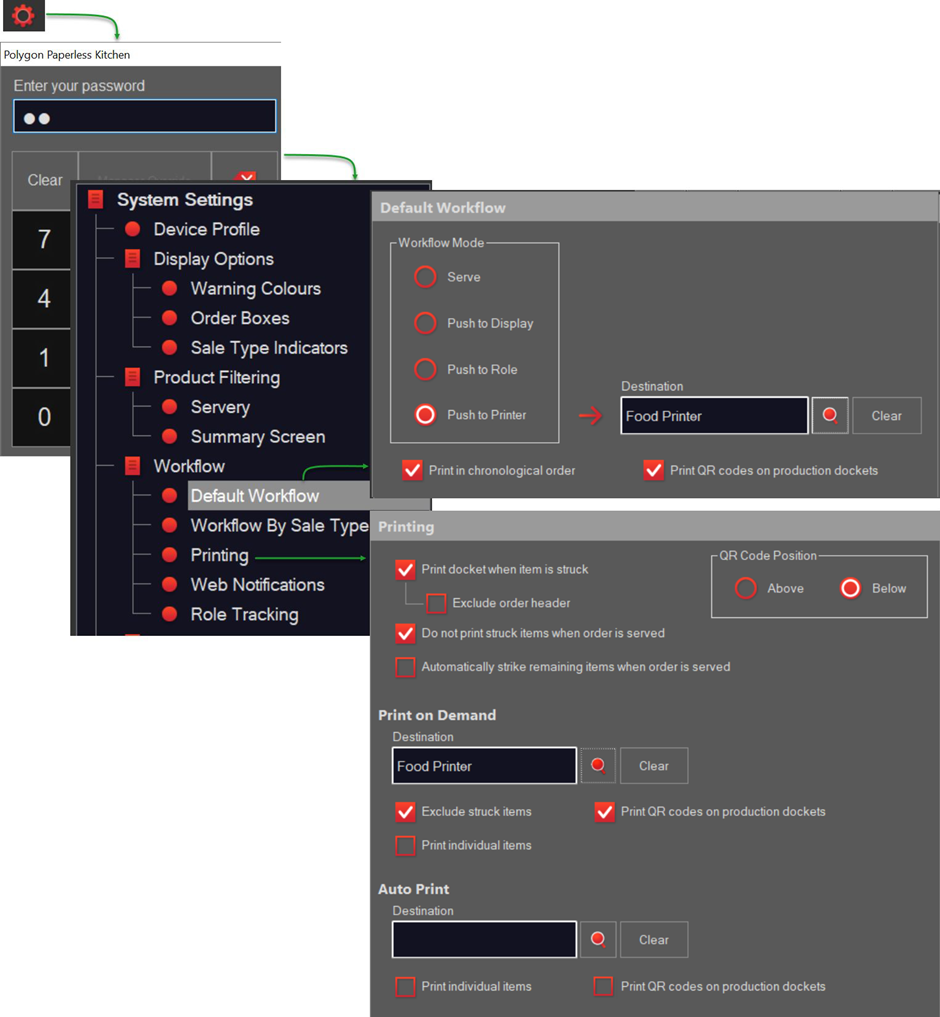
- Access the Settings button on the toolbar.
- Enter your password.
- On the Workflow menu
- under Default Workflow, choose Push to a Printer and select the printer from the pick list, -or-
- under Printing, enable the Print docket when item is struck (and Do not print struck items when order is served if appropriate).
- under Printing | Print on Demand, select the printer from the pick list, -or-
- under Printing | Auto Print, select the printer from the pick list.
If you are using a dispatch display, a QR code to recognise the order can be included on each option for printed dockets. If you want this, ensure the Print QR codes on production dockets is enabled.
You will need to choose if the QR Code Position will be above or below the order and select the appropriate radio button. You can find out more about using a dispatch display (including printer models which are supported for QR Codes) here.
Contents
Push to Print
If you assign the workflow of the KMS to Push to a Printer, orders will be retired and sent to a production printer (Push to Print) when the 'serve' button is used.
The 'serve' button will display the name of the printer to which the order will be sent.
Please note: the chosen production printer does not need to have categories assigned to support the orders that will be sent from the KMS.
When utilising Push to a Printer inverse printing of instructional categories as defined in the Categories File will be respected. To learn how to enable this, click here.
Print upon Strike
If you have chosen to Push to Print from this KMS device, you may also choose to automatically send a docket if an item is completed in advance of the entire order by enabling the Print docket when item is struck setting.
- If you enable the Print docket when item is struck each time a strike-through is applied to an item a docket will be sent to the printer containing only that item.
- If you do not wish to include the Order Header details on the docket, enable the Exclude Order Header setting.
- You may not wish to include items that have already been struck from an order on a docket, if so, ensure that the Do not print struck items when order is served option is on. Only the active items remaining in the sale will be printed when the order is marked as Done.
- If Automatically strike remaining items when order is served is enabled, any items in the order that are not already shown with a strike will have a strike-through applied. This is useful if an Executive View mode instance is in use.
Note: The Print docket when item is struck and Do not print stuck items when order is served options are ONLY applicable if the default workflow is Push to a Printer. It is therefore recommended that if any sale type requires a Push to Print workflow this should be programmed as the Default Workflow. Sale types that do not require Push to Print should then have individual workflows programmed. To learn more about programming workflows for specific sale types, click here.
Print on Demand
On occasion, operational requirements may mean that a printed docket is needed for a specific order without consistently printing production dockets for all orders. From time to time, it may be that a specific item in an order has special instructions (eg. gluten free) and you need a docket to accompany just that item.
To enable this functionality, you can define a production printer in the Print on Demand setting by clicking on the browse button to the right of the field and choose a printer from the list of production printers currently available in the network.
Please note: the chosen production printer does not need to have categories assigned to support the orders that will be sent from the KMS.
Defining a printer in the Print on Demand setting will enable the Print Order and Print Item button on the Order Toolbar.
- If you do not wish to include items that have already have a strike-through applied when issuing a Print Order command, place a tick in the Do not include struck items when order is printed box.
- If you wish to print a separate docket for each item in the order, place a tick in the Print Individual Items setting.
- instructions will print with parent items
- order header details will print on each docket, and each will include #/total# (1/3, 2/3, 3/3 etc) so that all items of the same order can be easily recognised.
Auto-print New Job
If you need new orders to automatically print when received, this can be achieved by assigning a printer from the list in the Auto Print section.
- If you wish to print a separate docket for each item in the order, place a tick in the Print Individual Items setting.
- instructions will print with parent items
- order header details will print on each docket, and each will include #/total# (1/3, 2/3, 3/3 etc) so that all items of the same order can be easily recognised.
Having the KMS auto-print is useful if a docket is required to accompany each order, or a sticky label required to affix to items.
Article Change Log
| Date | Record of Changes | Author |
|
Dec 2022 |
Inclusion of QR Code printing options. |
STB |